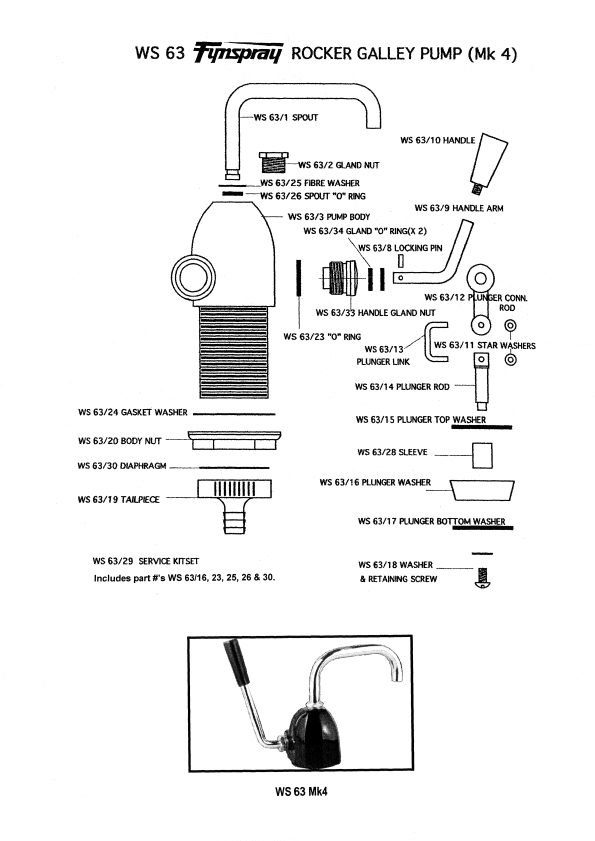
Service Kitset: WS63/29
To replace the diaphragm valve (#30) – Loss of prime
Unscrew tailpiece (#19) and replace diaphragm.
(Prior to tightening tailpiece to body, smear a little Vaseline to face of diaphragm).
NB: WHEN REPLACING TAILPIECE DO NOT OVER TIGHTEN AS THIS CAN CAUSE THE DIAPHRAGM TO DISTORT & NOT SEAT PROPERLY.
To replace the plunger washer (#16) – Loss of suction
Remove tailpiece (#19). Invert Pump jamming handle on bench top so that the plunger assembly is closest to base of pump. Undo retaining screw (#18) and then remove parts 28, 16 & 17 by holding the pump the right way up and shaking it so that the above parts all fall off. It is very important to note the order in which they come off. You can now replace the plunger washer (#16).
To assemble, the reverse procedure is followed – The plastic washers (#15 & 17) must have their flat surface facing the rubber cup washer (#16).
NB: Water should be sufficient lubrication for the plunger washer.
To lubricate gland
If required, lubrication of the Gland ‘O’ rings (#34) can be achieved by unscrewing the gland nut (#33), applying a little Vaseline on the handle arm (#9) & sliding the nut back and forth on the arm. Also apply Vaseline to ‘O’ ring (#23) before replacing the nut. (Do not over tighten)