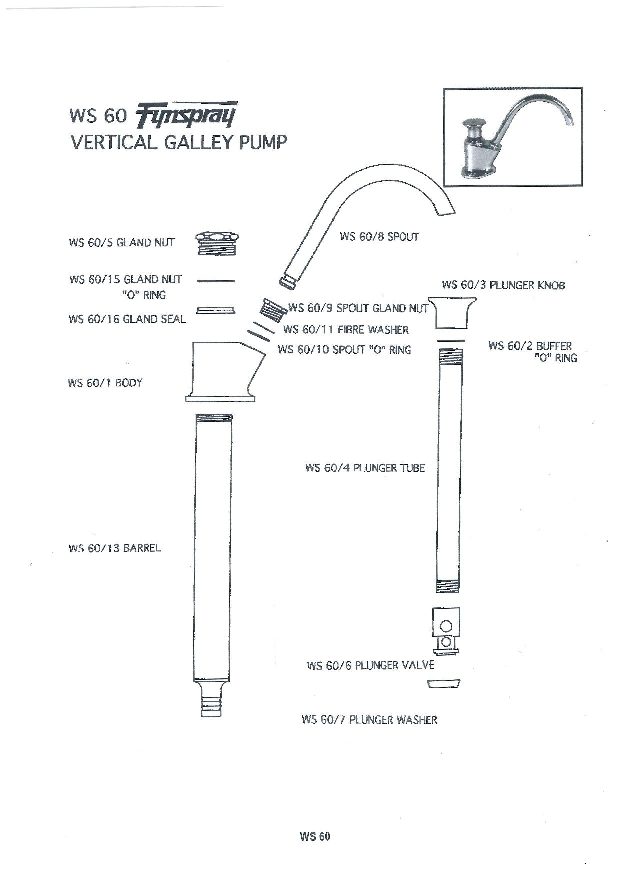
Service Kitset: WS60/14
To replace the plunger washer (#7) - Loss of suction
Unscrew the barrel (#13) from the body (#1). As a sealant has been used on the thread, and as no tools should be used, the body can be run under hot water to break the seal and then tapped with a soft headed hammer. Check that the plunger washer (#7) is soft and pliable (immerse in hot water or use a little oil) and that it is a push fit inside the pump barrel. If it is not a push fit and/or cracked it must be replaced. To replace Immerse the new plunger washer in hot water to soften and then push it up from the bottom into place. Make sure it is the correct way up. When assembled it covers the bottom plunger valve body hole and “floats”.
NB: Older models have a sleeve that is riveted to the plunger. To remove plunger valve put a Phillips screwdriver (or something similar) through the hole and hold that while unscrewing the plunger valve with a spanner.
To replace the gland seal (#16) on MK 2 model - Leaking at the gland.
Having removed the barrel (#13) (as above), unscrew the plunger valve body (#6) (earlier models unscrew the plunger knob (#3).
DO NOT HOLD THE PLUNGER TUBE IN ANY TOOLS AS THEY MAY CAUSE DAMAGE.
When replacing or removing the gland seal onto the plunger wind it in the direction of the plunger thread so as not to damage the lip edge.
The Gland nut ‘O’ ring (#15) is also included in the Service Kitset and whether replaced or not should be lubricated with a little Vaseline.
Note that both the gland nut (#5) and the spout gland nut (#9) should not be over-tightened.
Parts #7, 15, & 16 are contained in the service kitset.
NB: If you have a MK 1 model (prior to 1977) gland packing (#12) may be required.